Thursday, January 30, 2020

Impromptu Carpet Removal


Well… we’ve been back at work on the house again. We started by getting back to our bedroom restoration project. That has included, stripping the floor, starting to research colors of paint for the original door, stripping the door, and figuring out how to reframe the doorway to put the original door back. However, there will be a future blog post about all of that. Instead we are going to talk about how I convinced Jeremy to remove more carpet in the house, even after he said absolutely not before.  

This past weekend’s conversation went something like this:
Felicia: hmmm I wonder what the stairs look like under the carpet.
Jeremy: I’ve wondered that too.
Felicia: We could find out you know…..
Jeremy: ummm…..
Felicia: Don’t you want to know?
Jeremy: I guess I do.
Felicia: Let’s do it….
Jeremy: OK I suppose we can.
Felicia: Hey lets also take the landing carpet out too. Then we can see what the floor looks like and we have to do some work in that area with reframing the door anyways.
Jeremy: You said the stairs…..
Felicia: But we could have that little area of the house be historic again and just renovate that whole corner at once.
Jeremy: Ok that’ll work.
Felicia Well it’ll look dumb if we only do that part of the hallway… we should do the whole hallway.
Jeremy: ummm…..
Felicia: *stares at him*
Jeremy: ummm… ok, but we are NOT doing the spare bedroom or my office.
Felicia: ok J

So, this conversation is how we ended up ripping out the carpet on our stairs and our landing. We haven’t finished the hallway yet, but that’s on the docket for the weekend.


Stairs Before
Starting to remove the carpet!

The stairs took us around 2.5 hours to remove the carpet and pull out what must have been hundreds of staples. The stairs are currently red. They are also the first time that we found the obvious use of cut nails in our house.

Stairs without carpet

However, after looking past the previous owner’s sloppy painting, where he used the floor as a drop cloth… we realized that the stairs were actually cream on the sides and raw wood in the middle originally. This made us think that there may have been a runner on our stairs when the house was first lived in. Then, we found several carpet tacks along the path the carpet runner would have been laid. The carpet tacks are square tacks, another mid 19th century feature.

19th Century Carpet Tacks
Line of carpet tack marks


We do have 3 stairs that are cracked in half from 150 years of wear and tear. We will do some research and then repair those. We are still discussing what we will do with the stairs as far as painting vs runners.

Last night, we decided to tackle the landing floor. We pulled the carpet up and discovered a few more carpet tacks. Looking close to where those were found, we can see the lines of tiny holes where the carpet tacks once went. It appears the stairway runner ran up the stairs and to the wall. We also found a board that needs to be repaired and more paint from previous owner thrown all over the floor. 
Landing floor. This was originally a room, but a bathroom has been sectioned off.

We were able to pull the red paint up to see the original brown color of the floor. The floor has only been painted twice, both during the 19th century we believe. Originally it was brown and then it was painted the red you see in the photos.

Brown and red paint


We have decided to stay as true as possible to the original color of the floor, so it will be painted brown. We are going to try to get the original brown paint color matched and return it to the color it was originally, but first we have to get rid of the globs of white paint and make some repairs to the floor.

Friday or this weekend we will wrap up tearing out the rest of the carpet in the hallway and get ready to move on to the next restoration step for our bedroom/hallway.

What an adventure!

Wednesday, November 13, 2019

Wood Floor Refinishing Testing

     Woah! It sure was a busy summer here at History Acres. We have spent all summer working on our garden, fighting pests in the apple trees, painting, beating back grape vine and over growth, painting, planting some mulberry trees from a friend, painting, and working on the outside of the house. Oh and did I mention painting. Working until dark almost every night meant that the blog has been sadly neglected.

     So, we shall back up to March, when it was still cold. Jeremy and I decided to test out redoing our first floor hardwood floors. We actually have 2 floors on top of one another on the first floor. The original 19th century floor is wide boards and varnished. On top of that another floor was added. We think based on other renovation dates that this happened in the 1910's to replace/cover damage to the floor in the dining room. The wide board floor is missing from the dining room.


Our first view of our hardwood floors that had been covered with carpet for 30+ years!

19th century floor under the 1910's floor


Both the wide board and the small board floors are constructed using tongue and groove. When we explored this, we realized that we were not ok with sanding the floors to redo them. Sanding on tongue and groove can remove too much wood and then the tongue and groove can be compromised, especially if previous owners had done the same thing.

Tongue and groove floor in dining room

I spent some time researching and decided to try to chemically strip the floor, instead. We stripped the floor in the smallest room (our living history storage room) with Citristrip, which we left on for several hours to remove large paint splatters and old residues. We then scrubbed the floor with mineral spirits and finally washed in TSP. We let it dry.

Getting ready to spread the paint stripper

The floor cleaned and ready to be stripped


Floor after stripping, cleaning with mineral spirits, cleaning with TSP


After drying, we oiled the floor with pure Tung oil. We put 6 coats of Tung oil. 3 each day for 2 days, allowing each layer to dry completely before adding the next. (Note: you have to let the Tung oil cure for several weeks to make sure that it is fully dry before you sit anything on it)

Floor after a few layers of Tung Oil
Side note: PPE (personal protective equipment) is always important. So respirator, Tyvek suit, chemical gloves, and goggles were worn.

Once done, we decided not to wax the floor because that room does not get much traffic. The penetrating finish of the Tung oil allows for just adding another layer of Tung oil to freshen up the floor.

So we went from old, worn out, and paint covered..... to warm, clean, and full of life.

Top left to bottom right: ready to strip, cleaned, first layers of Tung oil, all finished and dry.


Tuesday, July 16, 2019

You never know what you will find once you start to pull a room apart.

Well, tonight's blog post is a bit of a spur of the moment write up, written with excitement to share our recent find. We have been very busy with the garden, trees, tractor, and general house upkeep. Today it was raining for most of the evening so we decided to head upstairs to the bedroom we have been remodeling.

We haven't had a chance to really write a post about the room remodel, so I will give it a quick explanation and if you stick with me you'll get to see the really cool things we found in the room.

To start this off: the room started off as "we are just going to paint it before we move our bedroom up there." Famous last words.

Room mid-carpet removal

Then it turned into... the carpet is older so maybe we will just replace that...  So we removed it and found the original wood flooring with the original paint (plus some extra since the previous owner painted his trim right on the ORIGINAL FLOOR.)

Original floor with hole for air pass through

Well, then we got poking around in another room and realized that the previous owners had drywalled over the plaster so we decided to poke around up in what will be our bedroom and we struck gold! We not only found the original plaster... but the original baseboards too. He just drywalled right over them. Thank goodness he didn't just get rid of them.

Baseboard recon mission

So, as you may guess by this point in time, we are now removing the baseboards and restoring them, removing all drywall (including the closets), and restoring the floor back to it's original 19th century color. Wow, did that escalate.

We started the process by removing the drywall. What a mess, but we found the plaster walls to be fairly stable under their wallpaper.

Drywall removal in progress


Funny thing you don't realize until you remove the drywall... now all the window frames and door frame pieces don't fit anymore, so we will need to redo those. But not to worry, because we have the original door, so we shall be putting that back and reframing the door anyways. Some of the old doors were found in one of the barns.

Door in barn


Well now that the drywall is removed and hauled off, we paused for a long time to try to get all of the outside tasks accomplished. But in the mean time, we hired an electrician to pull out half of the 10 outlets that were in the tiny room and remove all modern lights. Why no we aren't crazy, lamps are a great invention.

Today, we did a quick step to try to move the room forward since it was raining. We removed the wallpaper. There were two layers of wallpaper on the plaster. Really, we did this to try to ascertain the extent of the damage to the plaster from the previous owner putting a thousand screws into it to hang the furring strips that the drywall was hung on. We certainly did not expect to find what we found.

Pink wallpaper


First, off came the pink wallpaper put on by the owners we purchased the home from.


Blue wallpaper


Then we had to take down the blue wallpaper, hung by 2 owners before us. I don't know what he used to hang that wallpaper, but I think it could have glued just about anything together, the wallpaper was still so well stuck to the wall. We worked carefully to try not to pull off as much plaster as possible, since it is far easier to stabilize than repair. As we went we made some pretty amazing discoveries...


Wallpaper be gone


First, I found this guy and his friend:


Sketches on the wall. A man and a duck.


Someone wasn't convinced when I told him I thought it was a mid 19th century drawing.

Then we found this guy:

Sketch of person

and finally we found this guy and his pipe

Sketch of guy with pipe

So, after all of our discoveries, we both are fairly certain, based on other mid 19th century graffiti we have seen and drawings on other paper goods, including ones we own, that these drawing date to when the first owner built the house.

You never know what you are going to find!

Friday, April 19, 2019

Our Recent Purchase, Headache, Adventure, and Toy


Well, I said I would write this blog post 2 days ago and we see how that went… about as well as our delivery of said item.

Mystery Object

If you know us, or have been following the blog, you know we moved out into the country in December and have 12 acres. Our 12 acres now has a small orchard planted on it and we are planning our next project, a big garden. We lease 7-8 acres of the land to a farmer currently (honoring a lease that was signed with the previous owner). The garden still should be rather large with some room to expand. Some of the area is part of the field that the farmer gave us back, but a large portion of it is grass.


The person who farms our field has nicely offered to disc the garden for us, but it will need to be broken down further before we can plant. So… the moment you have all been waiting for…. What did we buy…….


A TRACTOR! Not just any tractor but a 1947 Farmall Model A and as one person commented of course it is old! We sure love our antiques. We went with a Farmall Model A because it’s small enough to fit in the barn and made to do row crops with a high clearance. We also really like that it looked like the older style of tractors (Pre-WWII) instead of the new style of modern tractors more similar to Ford Model 9N.

Farmall Model A


Farmall was a model/brandname for International Harvester. Most Farmalls were made for row-crops. They were primarily built as affordable, all-purpose tractors for small to medium family farms. It perhaps is one of the most well-known tractor brands in the 1940’s. The model is also a 1 plow tractor. The engine on this model is offset from the seat to be able to see where you are going.


Offset Engine from Seat


Now, we are super excited to have our Farmall tractor. We had been looking at these for a while and we got a good deal on this one. It needs a bit of work though. It needs all four tires and the clutch is stuck, but it runs well. So, after a quick call to my mechanic father to see if he’d help us fix up the tractor, we bought it!

Next step, how to get it home. The guy who owned the tractor also had a tow truck business and offered to drop it off. This is where the fun starts… They came to drop off the tractor and the flatbed truck pulls in the driveway (mistake 1). He then realizes the tractor needs to go into the carport. He tells Jeremy he will have to drive on the grass a little bit to get it turned around. This is where things go haywire.

Sunk Tow-Truck
The truck goes off of the grass more than a little and sinks. Not just sinks a little but buries itself to the axles. …. OOPS. Well, he can’t get out. He then calls another tow truck… which is unable to pull him out…. Then, he calls another larger tow truck and in the process of being successfully removed from the crater he had dug himself rips up even more of the yard and adds to the new pond that’s been dug for us.

It's moving!

Bye-bye truck!

Our temporary new swimming hole


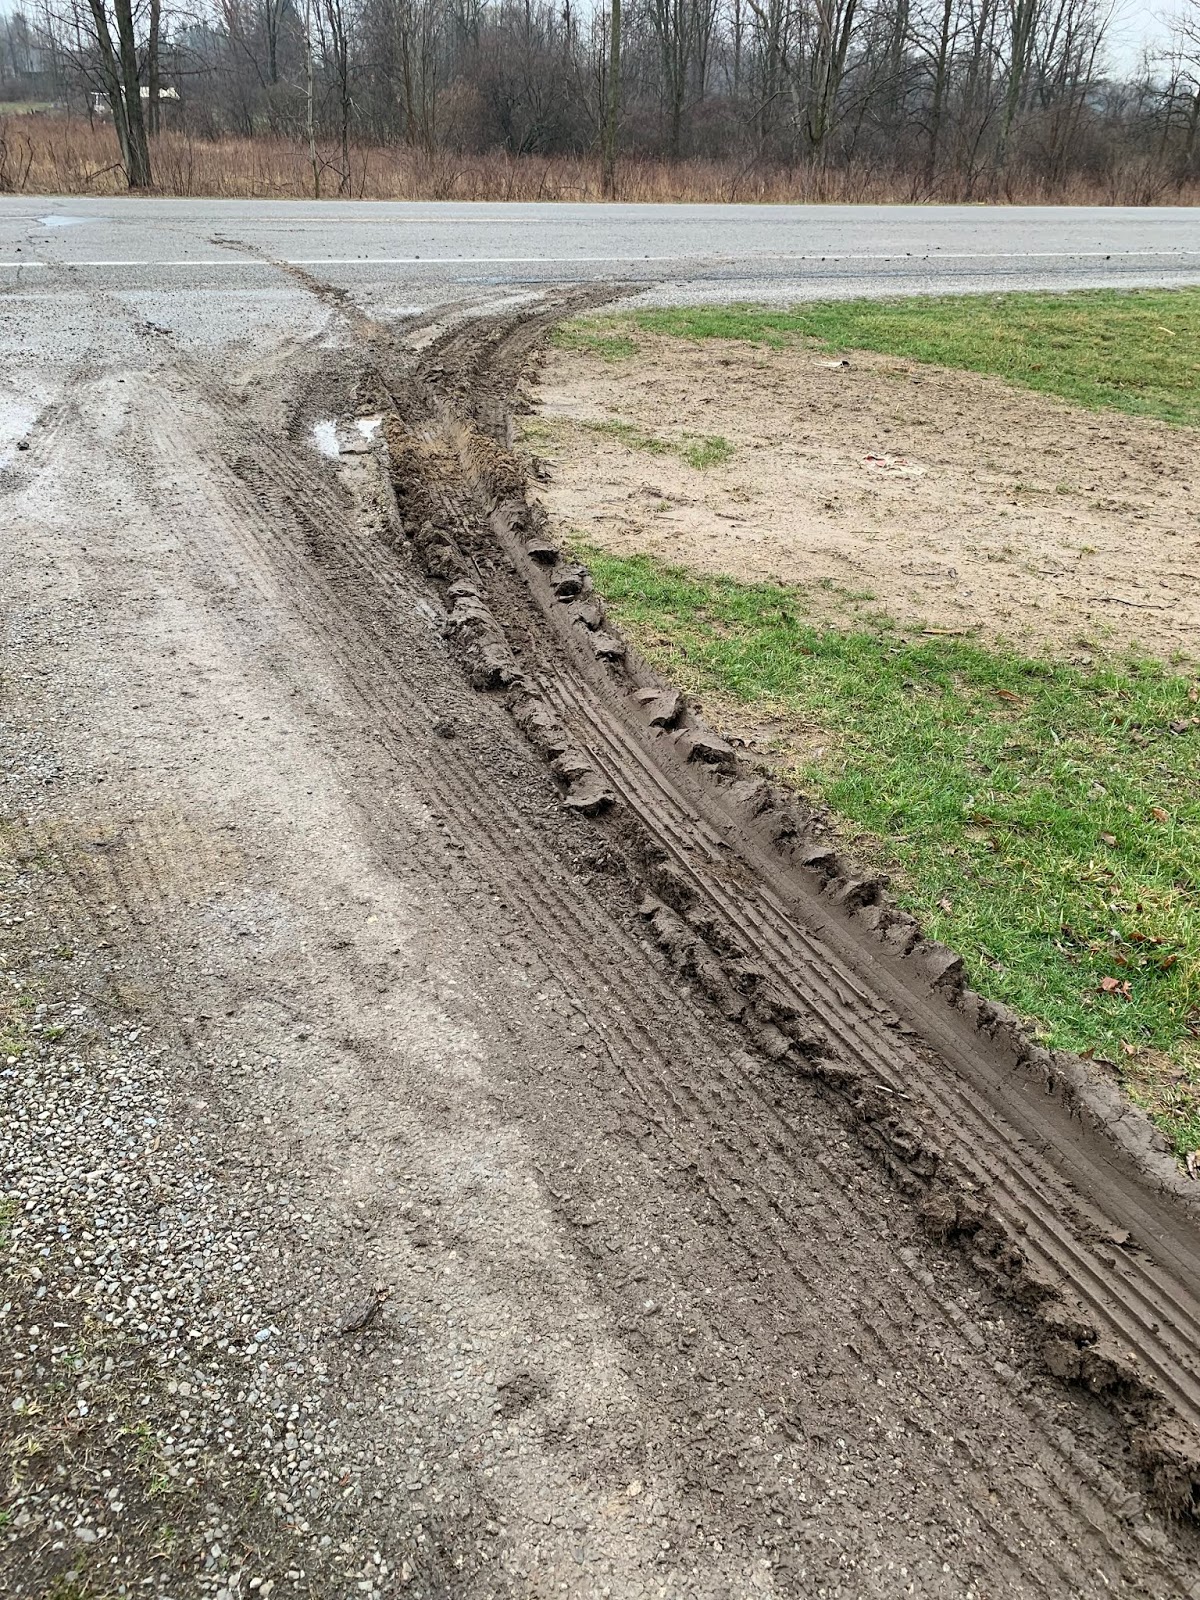
Finally, after being extracted he gets in his truck backs out of the driveway and cuts the wheel really hard and digs one final rut before leaving… wow what a crazy 4 hours. At least the owner of the tractor/tow truck company has said once things dry out he will fix the yard up just like it never happened. So now we hope it stops raining so it can dry out.

One last rut for good measure.

This blog post was partially delayed because the tractor was unloaded anywhere it could be gotten off of the truck safely to lighten its load. So, it was stuck half rolled over a stump and Jeremy and I could not roll it over it. So, special shout out to our good friend who drove over the next day to help us push it under the carport out of the rain that seems to never end this spring.


The bright side to it all is that our 1947 Farmall tractor is home and awaiting its new life on our farm.


Home Sweet Home

Wednesday, April 3, 2019

Planting the Apple Trees

With the apple trees ordered, it was time to do some research into how to plant the trees, along with doing some preparation before they arrived. One challenge was how much information is out there for planting apple trees. This is because the many different sources contradict each other. For example, some would say make a hole 2x the size of the root ball while other say just a little larger than the root ball. Another source would say, prune the roots or the branches while another would say never do that. In the end, we did our best to follow any direction that was provided by the nursery we ordered the trees from, since they provided a survival guarantee.

Before they arrived, we picked out ground for where we wanted them. The area seemed to stay well drained (much of our yard space is not), could be seen from several windows, was near the pond to help with watering, and was on the side of the house. Setting up a small orchard in the side yard seems to be very common historically, at least around here. Next was a soil test. Everything tested well for the apple trees except for the nitrogen test. That test seems to be a dud, as it showed no color change, nothing, at all. That just isn’t possible since there is very green grass and other things growing in the area. After reading reviews where others experienced similar “results,” we decided we were not too worried about this.

We then started some prep of the area, which included getting fence posts and fencing to keep deer away from the young trees. After some reading, we decided on four T posts around the tree with a five-foot wire welded fence set at a diameter of six feet. This should provide plenty of room for the tree to grow, keep deer from eating the tender branches, and for us to get in there to work if needed. While buying all of this at the store, (along with the fencing needed for the garden later) we had several people comment on how much work we had ahead of us!


We then cut out the sod in a four-foot diameter circle with the center of the trees spaced about 13-14 feet away from each other. The recommended distance was 12-16 feet so we are right in the middle. We then drove the fence posts into the ground. Then back to waiting for the trees.


The trees finally came! Wow, that is a much smaller box then what we pictured! The trees came well packed and were set up to be able to be stored for a few days if needed. We set them aside in a cool and dark place (also known as our basement) until we could get them into the ground.


Looking at the weather and knowing the time it would take we saw a window and went for it! We started late in the afternoon with excitement. Reading and rereading the directions provided we dug our first hole. Taking care to get the roots in a good place and pushing down the soil as we filled in the hole. Making sure the graft area was several inches above the soil and mulch level. Once the tree was in we put a good layer of mulch down around the tree. Then moved to the next one! At first, the archeologist in the family wanted to screen the dirt coming from the holes. So someone else made them a screen to do so. Well, this was really slowing things down and with nothing found in the first hole the search was suspended. The screen will be used another time!


Once all the trees were planted, fertilized, mulched, and watered we turned to the fencing. At this point, the sun was providing its last rays of any warmth with the wind turning to come from the north. While putting up the fencing and bending and twisting each of the clips into place the chill settled in! We were on the home stretch so kept going! We reached the last tree and started to stretch the fencing around when it became obvious we were three feet short! Into the truck we jumped and into town we went! We were both starving so dinner was had and another roll of fencing procured. Racing back home we completed the last fence in the dark with the headlights of the truck. Making it into the house at 11pm.


We woke up the next morning realized it had poured rain a good portion of the night and was still raining! Four of the trees were in good shape but one, which was in the lowest spot, was flooded. We went out into the rain and dug a trench to drain the water away. That evening the rain changed over to snow with dropping temps. The trees sure got a welcome to Michigan!


Thankfully, the young dormant trees are not supposed to be impacted by cold temperatures, snow, or frost.

Now we wait for them to wake up! Once they have leafed out we will water them again and keep watering them. They are supposed to provide fruit in 2-4 years but some have said they did get some apples the first year. We will find out later this year!

After all this, for some reason, we ordered a peach tree, cherry tree, blueberry bush, blackberries, and strawberries. But that will be another story.

Carpenter Bee Bee Gone!

This was a quick little project that wasn’t planned! This year we have noticed quite a few carpenter bees around the two barns and at least ...