Tuesday, June 9, 2020

Carpenter Bee Bee Gone!

This was a quick little project that wasn’t planned! This year we have noticed quite a
few carpenter bees around the two barns and at least one by the house. Generally,
bees are welcomed at History Acres since we are trying to grow things that require
pollination. However, we know these ones are of the destructive mindset. We had a
quick discussion that we should probably start to do something about them. We
didn’t notice them last year so perhaps their population increased or maybe we are
just being more aware. Hard to say but the need was here.

Interestingly enough, a friend posted on Facebook that they just made a cute
carpenter bee trap that was working. Heading out that day, they were buzzing
around again. I did a quick Google search to get some additional ideas and
knowledge of how they should be built. One of the first hits was this one. That looks
simple and easy to do with scrap wood sitting around the workshop. Here is how it went
together.

I didn’t have any 4x4 pieces but loads of 2x4 pieces. For each one, I took two pieces
about 6” in length and screwed them tightly together on one end, using 2” screws.
Then chopped the other end, as one unit, on a 45 to shed water. Putting a third 2”
screw in at the top on the opposite side to hold them securely together.


The block went into the vise in a position to drill all the holes needed without
repositioning. First was a 7/8” paddle bit into the bottom just about 3.5". Marking
the depth on the bit with a piece of masking tape. Next, I ran a ½” paddle, one hole
on each side, at an upward angle. Why an upward angle? Well that seems to be what
was done in others so I did it too! Sounds like it helps ensure the light which they head toward only
really comes from the jar so they can't escape. The holes were positioned in the center
about 2” up from the bottom.


Now, for the jar they will fall into. Grabbed an extra pint jar, seal, and ring. Punch one
hole with a nail in the center of the seal top and a hole to either side of that closer to
the edge. Use a ½” drill bit to enlarge the center hole which will line up with the
7/8” hole once attached. The metal is thin and doesn’t drill too cleanly, but I don’t
think the bees will mind. Drop the seal in into the ring, center it on the bottom over
the large hole, run a screw into each of the remaining punched holes to secure it.


All that is left is to screw on the jar, add a way to hang it, and hang it! I made three
fairly quickly and in less then 24 hours they seem to be working.


Hopefully, this is an easy way to knock back the wood-damaging bees on the
property. If you have the same need or want a quick diversion project, give this a go.
Modifying it to use what you have sitting around to make it nice and cheap.

Sunday, May 31, 2020

Learn By Doing: Gardening

Ok... I promise I will be better about updating more frequently on the blog. Everything going on in the world, home renovations, and the start of spring really had us running around like mad. 

Laura Ingalls Wilder wrote in one of her books "There was no time to lose, no time to waste in rest or play. The life of the earth comes up with a rush in the springtime." 

This is so very true. Last year, spring came in with repeated torrential rains, which meant we were unable to put in a garden until June. We cut the sod with a sod cutter in a torrential rain storm. When we finally heard thunder we went into the barn. I looked at my phone and saw that we had been under a tornado warning.... oops. 

Why yes we did do this in a tornado warning... oopsie
Why yes, we did do this in a tornado warning... oopsie
     
Muddy and taking shelter in the barn while we wait out the storm.

We then constructed a fence to keep the deer and groundhogs out. We used 7ft t-posts with 5 foot hardware cloth with 12-18 inches kicked out at the bottom to keep animals from digging their way into the garden. We put chicken wire above that another 2ft. We only attached the bottom half and left the top floppy so if an animal tries to climb it their weight will flop them back off of it. Finally, we ran a wire around the very top to discourage the deer from jumping in. 

Jeremy driving the fence posts
The garden fence going up. Stay out deer!


After all of that, we finally planted the garden. And then.... it rained. And it rained. We got 1.5 inches of rain immediately after we planted... Sigh. We lost 49/50 bean seeds. Only one survived and germinated. We dug drainage trenches to save the strawberries as we sunk into the muck. It killed all 9 cucumber plants and almost killed the watermelon. The carrots were washed away. Despite all of that, some of it survived. And we just went with it because we felt defeated. We battled weeds and grass all summer and fall.
2019 garden planted!


The devastation the next day after 1.5" of rain fell overnight and that day


So what did we do this year differently that we learned the hard way, but you don't have to.

As we harvested and at the end of the year we covered the garden in black plastic to smother the grass. It baked in the sun and helped clear out the grass.

We amended the soil with compost. We have soil with a high clay content. The root vegetables do not like this soil at all. We amended with compost in hopes of breaking up the clay a little. We put 3 yards (or 3 5 ft truck beds full) of compost in the garden. This was enough for a little over half an inch on the whole garden. We hope to add this again in the fall and spring to continue to amend the soil.

So much compost was shoveled.


Well we planted 2 weeks earlier Memorial Day weekend. And you'll never guess what it did after we planted.... it rained....again. We got .5 inches of rain this time. Not great, but no where near as much.  We mounded our cucumber plants this year to shed water and they survived the deluge. 

Garden planted 2020


We covered all of the ground where plants and mounds were with landscaping cloth to cut down on the weeding. 

Landscape cloth to cut down on weeds


Instead of planting bush beans we planted pole beans around a bean teepee. Each seed was planted in a hole in the landscape cloth to help with weeding and to keep the water from washing the seeds away. 

Bean teepee construction


The lessons were hard learned on our part, but if we can help someone else we will try. This year after taking the lessons to heart and rethinking our strategy all of the plants are growing and the seeds are sprouting and growing fast. We are much further ahead this year than where we were this time last year. 

We have strawberries!
The beginnings of butternut squash
 

Tiny turnips!


Thursday, January 30, 2020

Impromptu Carpet Removal


Well… we’ve been back at work on the house again. We started by getting back to our bedroom restoration project. That has included, stripping the floor, starting to research colors of paint for the original door, stripping the door, and figuring out how to reframe the doorway to put the original door back. However, there will be a future blog post about all of that. Instead we are going to talk about how I convinced Jeremy to remove more carpet in the house, even after he said absolutely not before.  

This past weekend’s conversation went something like this:
Felicia: hmmm I wonder what the stairs look like under the carpet.
Jeremy: I’ve wondered that too.
Felicia: We could find out you know…..
Jeremy: ummm…..
Felicia: Don’t you want to know?
Jeremy: I guess I do.
Felicia: Let’s do it….
Jeremy: OK I suppose we can.
Felicia: Hey lets also take the landing carpet out too. Then we can see what the floor looks like and we have to do some work in that area with reframing the door anyways.
Jeremy: You said the stairs…..
Felicia: But we could have that little area of the house be historic again and just renovate that whole corner at once.
Jeremy: Ok that’ll work.
Felicia Well it’ll look dumb if we only do that part of the hallway… we should do the whole hallway.
Jeremy: ummm…..
Felicia: *stares at him*
Jeremy: ummm… ok, but we are NOT doing the spare bedroom or my office.
Felicia: ok J

So, this conversation is how we ended up ripping out the carpet on our stairs and our landing. We haven’t finished the hallway yet, but that’s on the docket for the weekend.


Stairs Before
Starting to remove the carpet!

The stairs took us around 2.5 hours to remove the carpet and pull out what must have been hundreds of staples. The stairs are currently red. They are also the first time that we found the obvious use of cut nails in our house.

Stairs without carpet

However, after looking past the previous owner’s sloppy painting, where he used the floor as a drop cloth… we realized that the stairs were actually cream on the sides and raw wood in the middle originally. This made us think that there may have been a runner on our stairs when the house was first lived in. Then, we found several carpet tacks along the path the carpet runner would have been laid. The carpet tacks are square tacks, another mid 19th century feature.

19th Century Carpet Tacks
Line of carpet tack marks


We do have 3 stairs that are cracked in half from 150 years of wear and tear. We will do some research and then repair those. We are still discussing what we will do with the stairs as far as painting vs runners.

Last night, we decided to tackle the landing floor. We pulled the carpet up and discovered a few more carpet tacks. Looking close to where those were found, we can see the lines of tiny holes where the carpet tacks once went. It appears the stairway runner ran up the stairs and to the wall. We also found a board that needs to be repaired and more paint from previous owner thrown all over the floor. 
Landing floor. This was originally a room, but a bathroom has been sectioned off.

We were able to pull the red paint up to see the original brown color of the floor. The floor has only been painted twice, both during the 19th century we believe. Originally it was brown and then it was painted the red you see in the photos.

Brown and red paint


We have decided to stay as true as possible to the original color of the floor, so it will be painted brown. We are going to try to get the original brown paint color matched and return it to the color it was originally, but first we have to get rid of the globs of white paint and make some repairs to the floor.

Friday or this weekend we will wrap up tearing out the rest of the carpet in the hallway and get ready to move on to the next restoration step for our bedroom/hallway.

What an adventure!

Wednesday, November 13, 2019

Wood Floor Refinishing Testing

     Woah! It sure was a busy summer here at History Acres. We have spent all summer working on our garden, fighting pests in the apple trees, painting, beating back grape vine and over growth, painting, planting some mulberry trees from a friend, painting, and working on the outside of the house. Oh and did I mention painting. Working until dark almost every night meant that the blog has been sadly neglected.

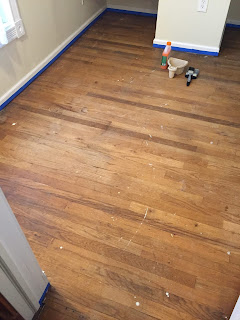
     So, we shall back up to March, when it was still cold. Jeremy and I decided to test out redoing our first floor hardwood floors. We actually have 2 floors on top of one another on the first floor. The original 19th century floor is wide boards and varnished. On top of that another floor was added. We think based on other renovation dates that this happened in the 1910's to replace/cover damage to the floor in the dining room. The wide board floor is missing from the dining room.


Our first view of our hardwood floors that had been covered with carpet for 30+ years!

19th century floor under the 1910's floor


Both the wide board and the small board floors are constructed using tongue and groove. When we explored this, we realized that we were not ok with sanding the floors to redo them. Sanding on tongue and groove can remove too much wood and then the tongue and groove can be compromised, especially if previous owners had done the same thing.

Tongue and groove floor in dining room

I spent some time researching and decided to try to chemically strip the floor, instead. We stripped the floor in the smallest room (our living history storage room) with Citristrip, which we left on for several hours to remove large paint splatters and old residues. We then scrubbed the floor with mineral spirits and finally washed in TSP. We let it dry.

Getting ready to spread the paint stripper

The floor cleaned and ready to be stripped


Floor after stripping, cleaning with mineral spirits, cleaning with TSP


After drying, we oiled the floor with pure Tung oil. We put 6 coats of Tung oil. 3 each day for 2 days, allowing each layer to dry completely before adding the next. (Note: you have to let the Tung oil cure for several weeks to make sure that it is fully dry before you sit anything on it)

Floor after a few layers of Tung Oil
Side note: PPE (personal protective equipment) is always important. So respirator, Tyvek suit, chemical gloves, and goggles were worn.

Once done, we decided not to wax the floor because that room does not get much traffic. The penetrating finish of the Tung oil allows for just adding another layer of Tung oil to freshen up the floor.

So we went from old, worn out, and paint covered..... to warm, clean, and full of life.

Top left to bottom right: ready to strip, cleaned, first layers of Tung oil, all finished and dry.


Tuesday, July 16, 2019

You never know what you will find once you start to pull a room apart.

Well, tonight's blog post is a bit of a spur of the moment write up, written with excitement to share our recent find. We have been very busy with the garden, trees, tractor, and general house upkeep. Today it was raining for most of the evening so we decided to head upstairs to the bedroom we have been remodeling.

We haven't had a chance to really write a post about the room remodel, so I will give it a quick explanation and if you stick with me you'll get to see the really cool things we found in the room.

To start this off: the room started off as "we are just going to paint it before we move our bedroom up there." Famous last words.

Room mid-carpet removal

Then it turned into... the carpet is older so maybe we will just replace that...  So we removed it and found the original wood flooring with the original paint (plus some extra since the previous owner painted his trim right on the ORIGINAL FLOOR.)

Original floor with hole for air pass through

Well, then we got poking around in another room and realized that the previous owners had drywalled over the plaster so we decided to poke around up in what will be our bedroom and we struck gold! We not only found the original plaster... but the original baseboards too. He just drywalled right over them. Thank goodness he didn't just get rid of them.

Baseboard recon mission

So, as you may guess by this point in time, we are now removing the baseboards and restoring them, removing all drywall (including the closets), and restoring the floor back to it's original 19th century color. Wow, did that escalate.

We started the process by removing the drywall. What a mess, but we found the plaster walls to be fairly stable under their wallpaper.

Drywall removal in progress


Funny thing you don't realize until you remove the drywall... now all the window frames and door frame pieces don't fit anymore, so we will need to redo those. But not to worry, because we have the original door, so we shall be putting that back and reframing the door anyways. Some of the old doors were found in one of the barns.

Door in barn


Well now that the drywall is removed and hauled off, we paused for a long time to try to get all of the outside tasks accomplished. But in the mean time, we hired an electrician to pull out half of the 10 outlets that were in the tiny room and remove all modern lights. Why no we aren't crazy, lamps are a great invention.

Today, we did a quick step to try to move the room forward since it was raining. We removed the wallpaper. There were two layers of wallpaper on the plaster. Really, we did this to try to ascertain the extent of the damage to the plaster from the previous owner putting a thousand screws into it to hang the furring strips that the drywall was hung on. We certainly did not expect to find what we found.

Pink wallpaper


First, off came the pink wallpaper put on by the owners we purchased the home from.


Blue wallpaper


Then we had to take down the blue wallpaper, hung by 2 owners before us. I don't know what he used to hang that wallpaper, but I think it could have glued just about anything together, the wallpaper was still so well stuck to the wall. We worked carefully to try not to pull off as much plaster as possible, since it is far easier to stabilize than repair. As we went we made some pretty amazing discoveries...


Wallpaper be gone


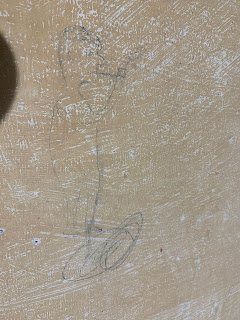
First, I found this guy and his friend:


Sketches on the wall. A man and a duck.


Someone wasn't convinced when I told him I thought it was a mid 19th century drawing.

Then we found this guy:

Sketch of person

and finally we found this guy and his pipe

Sketch of guy with pipe

So, after all of our discoveries, we both are fairly certain, based on other mid 19th century graffiti we have seen and drawings on other paper goods, including ones we own, that these drawing date to when the first owner built the house.

You never know what you are going to find!

Carpenter Bee Bee Gone!

This was a quick little project that wasn’t planned! This year we have noticed quite a few carpenter bees around the two barns and at least ...